
The Normalization module in Supplier Data Manager (SDM) validates your supplier catalog against pre-defined business and formatting rules, highlights any errors or missing values, and lets you correct them before the data moves to the next stage. It is the quality-gate step that ensures product data is correctly typed, complete, and compliant before integration into your target system (for example, Akeneo PIM).
What does the Normalization module check?
When a job reaches the Normalization module in SDM, four operations run automatically:
-
Type checking — Verifies that each field contains the expected data type. For example, a numeric field containing the string
"19"is converted to a number. A non-convertible value (for example,"AA"in a numeric field) raises an error. - Requirement level verification — Confirms that mandatory fields are filled in. An empty required field raises an error.
- Transformation execution — Runs any pre-configured transformation rules on field values to clean and standardize data.
- Rule and warning validation — Checks field values against specific business rules (for example, selling price must be higher than buying price) and raises errors or warnings where values do not comply.
Normalization rules are configured by your SDM administrator. To learn about available rule and warning types, see Rule & warning types. To learn about available transformations, see Transformation types.
Understanding the Normalization module interface
The Normalization module in SDM displays four tabs to help you track review progress:
- All products — Every product row in the job, regardless of its review status.
- To review — Rows containing errors or warnings that require attention. A counter in the first column indicates how many fields have issues on each row. An error or warning icon appears next to each affected field.
- Automatically checked — Rows that passed the configured checks without requiring manual review.
- Manually reviewed — Rows that a user has already validated or corrected.

The screenshot above shows an earlier version of the Normalization module interface and the row list with error counters in the first column.

The screenshot above shows the Normalization module row list with error and warning icons displayed next to affected fields.
All rows with errors must be corrected and validated before you can proceed to the next step. Rows with only warnings can be bypassed using the Ignore Warnings button.
How to correct and validate rows in the Normalization module
To fix errors detected by the Normalization module in SDM:
- Open the To review tab. The list displays only rows that need attention.
- Select the row you want to review.
- Click Edit to open the side panel. By default, only fields with errors or warnings are shown.
- Review the description displayed under each field with an issue — it explains what the rule requires.
- Correct the field value as needed and save your changes.
- Repeat for each remaining row in the To review tab.
- Once all error rows are resolved, validate the entire Normalization step to proceed.
To see all fields in a row (not just the ones with issues), click Show all the fields in the row inside the side panel.
When you update a field that has a transformation rule attached, all transformations for that field re-execute automatically. An information icon in the side panel alerts you when this occurs. Review the transformed value before saving.

The screenshot above shows the row editing side panel in the Normalization module, with error descriptions under affected fields and the option to show all fields or ignore warnings.
Batch corrections
If multiple rows share the same error, you can edit them together. Select several rows before clicking Edit — your corrections apply to all selected rows at once.
Edit rows in bulk with AI
This feature is in early access. Reach out to your SDM contact if you're interested in trying it out.
AI-assisted bulk edit lets you describe a repetitive correction in plain language and apply it across a selection of rows. For example, you can standardize a brand name, reformat a reference, or fill an empty field with a default value.
To edit rows with AI:
- Select the rows you want to edit. To target every row matching the current filters, select the current page and then click Select all N rows.
- Click AI Edit in the bulk action bar.
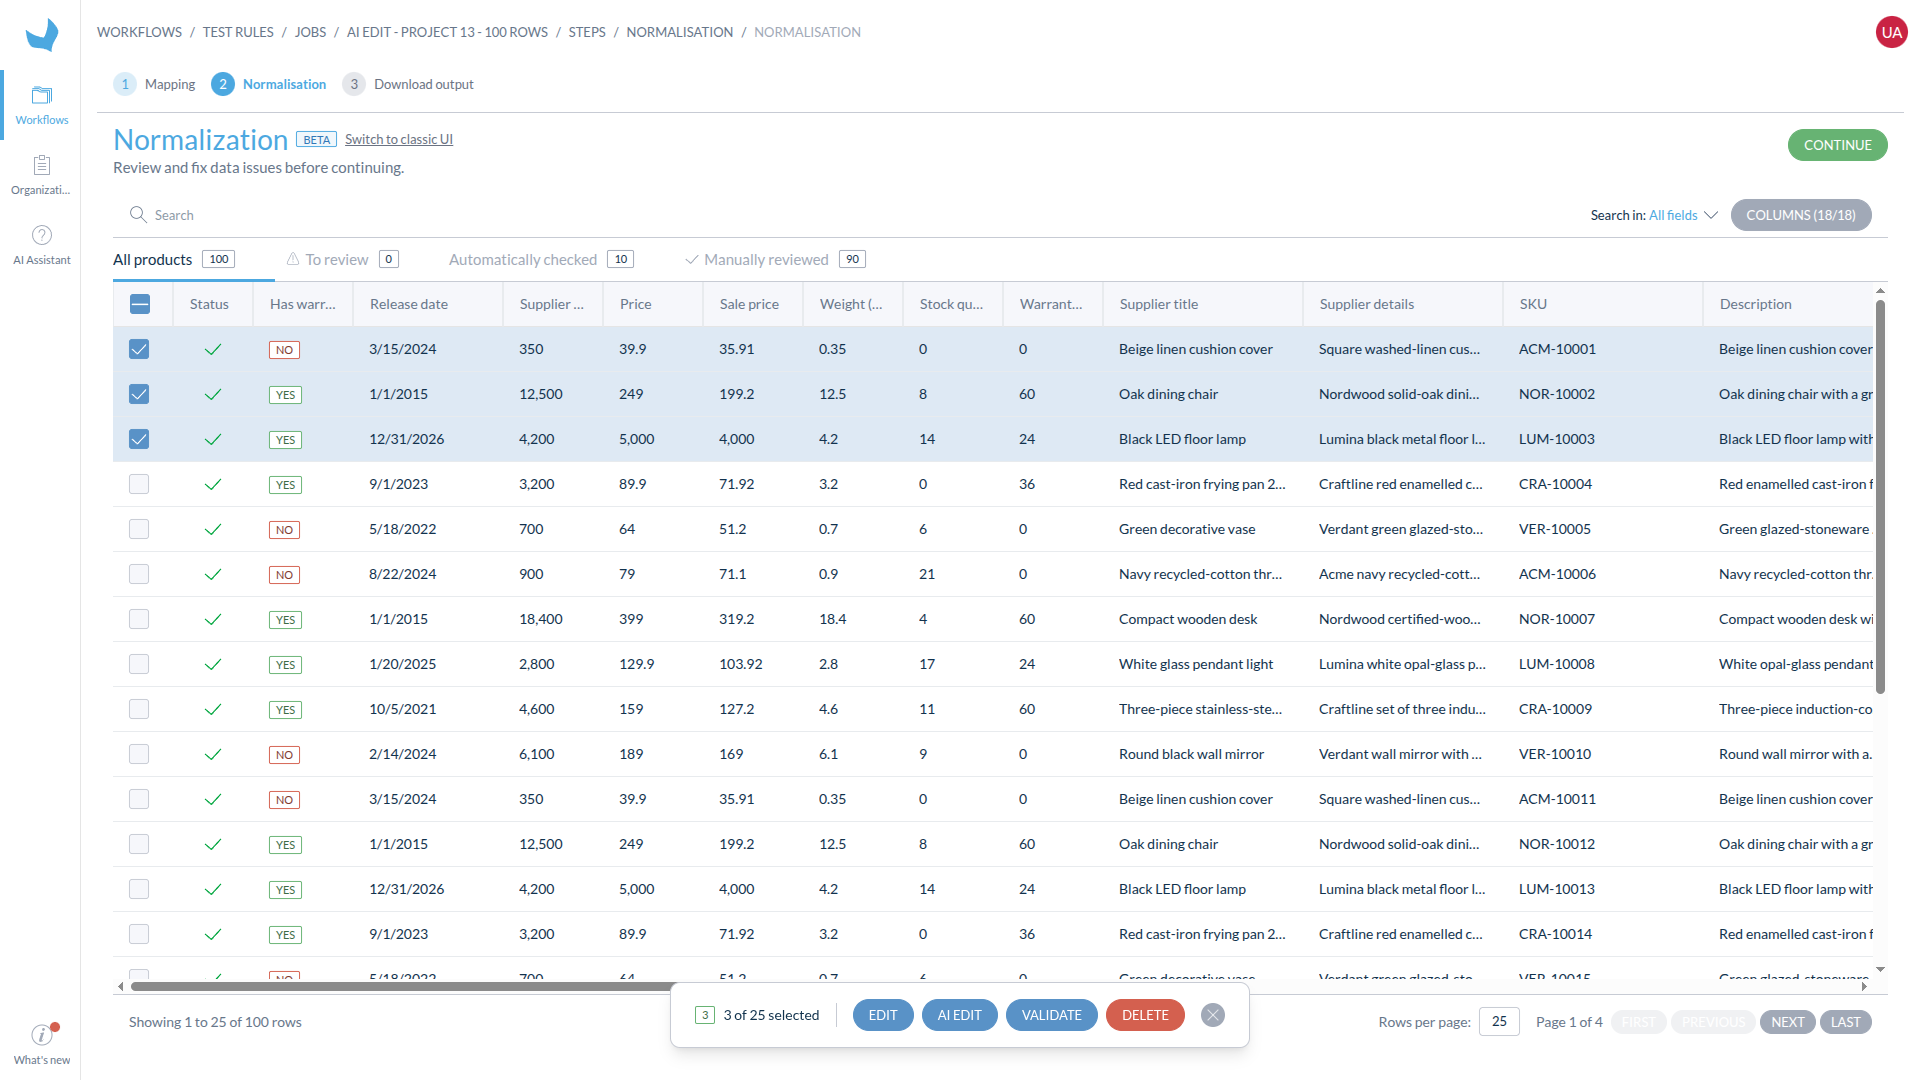
Three product rows are selected and the AI Edit action is available in the bulk action bar.
- Describe the transformation you want to apply, then click Send. Be precise about the field, the condition, and the expected result. For example: "Convert the Brand field to uppercase for every selected row."
- Review the suggested changes. The preview shows before-and-after values for up to three sampled rows. Fields marked used by the AI, unchanged provided context but will not be modified.
- If the result is not what you expected, click Cancel, let me refine, clarify your instruction, and send it again. If the AI asks a follow-up question, answer it in the same panel.
- Once the preview looks correct, click Apply to N rows. The edit runs in the background across the full selection, including rows that were not shown in the preview.
- Wait for the edit to finish, then review the rows again. SDM reruns the configured Normalization validations, so some errors or warnings may remain and require manual correction.
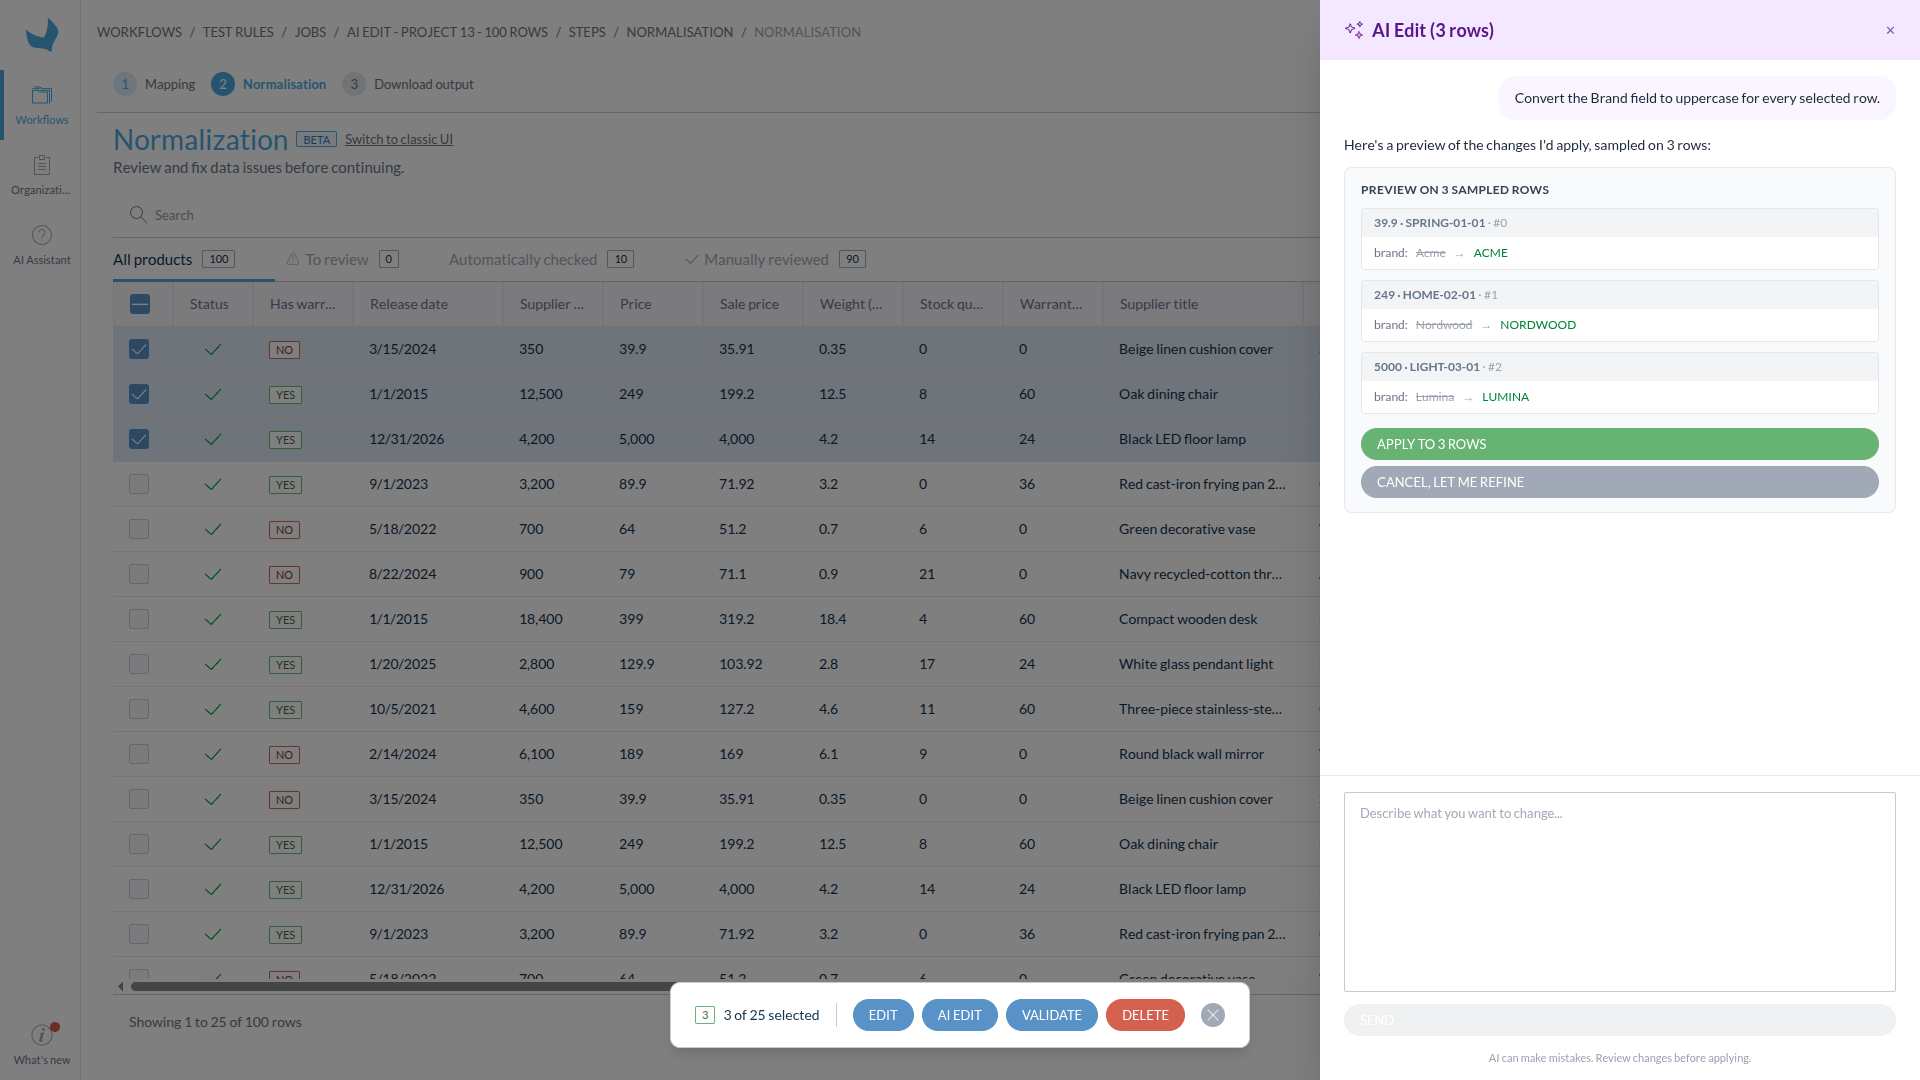
The AI Edit panel previews changes on three sampled rows before applying them to the full selection.
AI can make mistakes. The preview contains at most three sampled rows, while Apply to N rows changes the entire selection. Review the preview carefully and verify the results after the edit completes.
Applying an edit to more than 1,000 rows requires an additional confirmation. AI-assisted bulk edits cannot be undone.
This feature is available only to organizations where it has been enabled. It is not available to users working through Supplier Access.
Working with media files in the Normalization module
If your product data includes media attributes (for example, images or documents), the Normalization module in SDM lets you review and attach the correct files.
To add or update a media file:
- Select the product row and click Edit to open the side panel.
- Click Add media on the media attribute to attach an image or file. You can either select a file from a previous import or upload a new one.
- The same media file can be applied to multiple rows if applicable.
If your SDM is connected to Akeneo PIM, ensure that your media file naming conventions match your catalog's rules. This allows SDM to automatically relink media files after updates without requiring manual re-attachment.
Managing visible columns
You can customize which columns appear in the Normalization module table to focus on the most relevant fields.
- Select a product row and click Edit to open the side panel.
- Use the column visibility selector to choose which columns to display in the table.

The screenshot above shows the column visibility selector in the Normalization module, allowing users to toggle which fields are displayed in the product table.
If your organization reuses the same label across multiple attributes or options (for example, several families have a "Size" attribute), turn on Display attribute and option codes setting to show the code alongside each label, such as Size (size_eu).
Errors vs. warnings
The Normalization module distinguishes between two types of issues:
- Errors — Hard requirements. A row with an error blocks the job; it cannot proceed to the next step until the error is corrected.
- Warnings — Soft requirements. If a row has only warnings (no errors), you can click Ignore Warnings to acknowledge and bypass the warning without correcting the value.
Related
- Normalization rules administration — Configure normalization rules, transformations, and field inclusion settings (admin guide).
- Rule & warning types — Full list of available rules and warning types.
- Transformation types — Full list of available data transformations.
- Modules overview — Overview of all SDM modules and how to combine them.