


How to get the best of the New Advanced Product Grid?
Overview
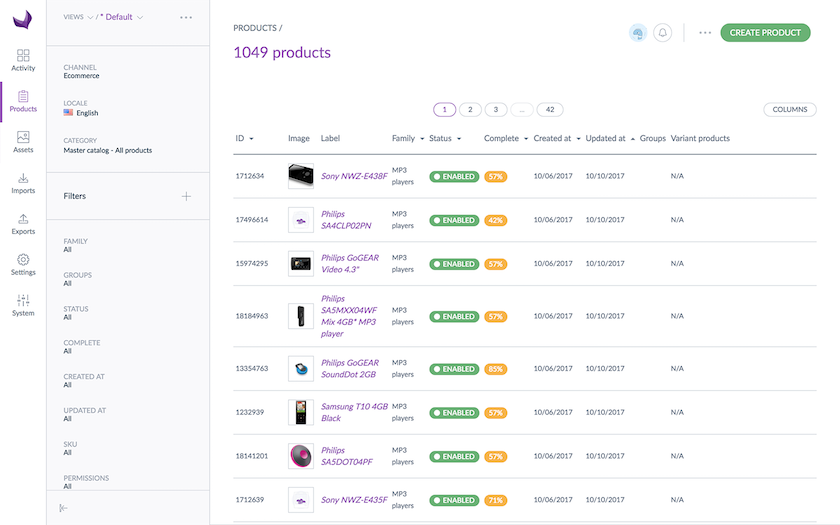
The Product Grid is the central workspace for browsing, filtering, and managing your product catalog in Akeneo PIM. It displays both products and product models in a unified, configurable list, giving your teams a real-time view of your catalog data across channels and locales.
From the Product Grid, you can:
- Search and filter your catalog by attributes, categories, labels, or identifiers
- Navigate your category trees to browse specific subsets of your catalog
- Configure which columns appear in the table and how results are sorted
- Select products individually or in bulk to apply mass actions
- Edit Boolean attribute values inline directly within the grid
- Switch the active channel and locale to see localized, channel-specific data
- Work in the context of saved Views or Projects to stay focused on the right subset of your catalog
- Create new products or product models

💡 Ready to discover with a quick, interactive guided tour?
Take a guided tour and learn how to use this feature step-by-step: Interactive demo.
Accessing the Product Grid
To access your products, click Products in the top left navigation menu.
This page is your central workspace for browsing, searching, filtering, and managing your entire catalog: products, product models, categories, filters, channels, and locales are all accessible from here.
If available on your instance, a version toggle in the left panel lets you switch between the Classic grid and the Advanced grid. Your preference is remembered across sessions.
Understanding the Product Grid Interface
The Product Grid is organized into three main areas:
| Area | Description |
|---|---|
| Left Navigation Panel | Contains the feature selector (Views / Projects), channel and locale selectors, and your currently active filters. It can be collapsed to maximize the grid space. |
| Main Grid Area | Displays the product and product model table with the search bar, display and rows-per-page selector, pagination, action shortcut per row, bulk action toolbar, and the Create products button. |
| Secondary Panels | Contextual panels that slide open alongside the left panel: the Filters Management Panel (to add or remove filters) including the category filter, which, for category tree selection, opens the Category Panel. Only one secondary panel can be open at a time. |
The page header displays the total number of matching products and product models returned by your current filters.
Setting Your Working Context
Before working in the Product Grid, select the correct locale and channel context. These two selectors, located at the top of the left panel, determine which version of your product data is displayed across the entire page.
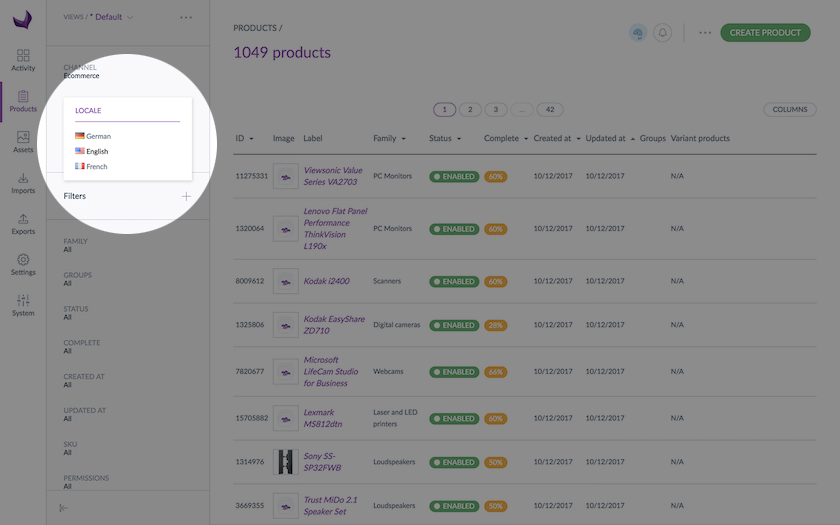
Selecting a Locale
If several locales have been activated in your catalog, choose your working locale from the locale dropdown in the left panel. The selected locale impacts the following information on the page:
- The category labels displayed in the category panel
- The attribute labels available as filters in the filters section
- The attribute group labels
- The attribute option labels used as values in the product grid
- The completeness displayed in the Complete column (as a percentage)
- The product and attribute values shown in the grid columns
Every time the locale changes, all product information in the grid updates accordingly. The working locale selected on the product grid page is also applied when you edit or view a product form.

The locales displayed have been added to at least one channel. If you do not see your working locale, you may not have the appropriate access rights to view or edit products for this locale (Enterprise Package). Contact your administrator for support.
Another possibility is that the locale is not required by any channel and therefore is not activated.
The working locale is different from the user interface locale, which is part of its favorite catalog and product grid settings available from the user's account settings.
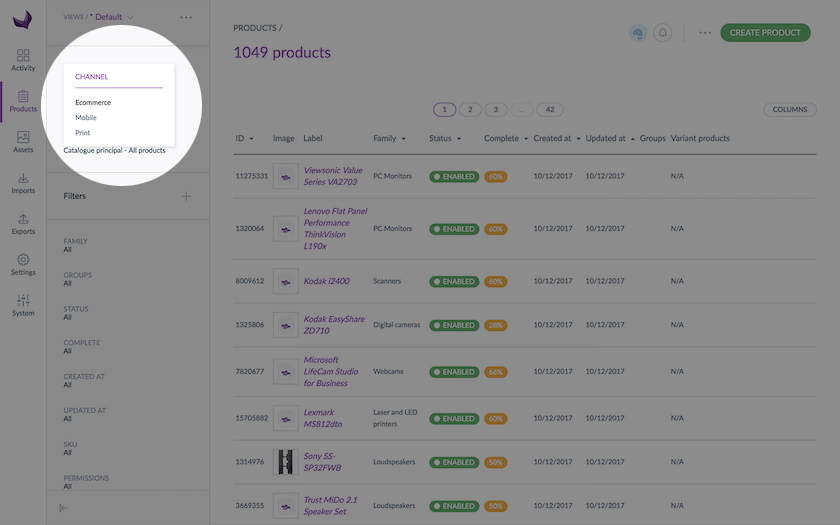
Selecting a Channel
A dropdown menu in the left panel lets you select your working channel (also referred to as scope). The selected channel impacts:
- Attribute values displayed in the grid, particularly for channel-specific attributes
- The completeness percentage, since completeness is calculated per channel/locale combination
- The available locales for the product selection.
The grid updates whenever the working channel changes. Like the locale, the channel selected on the Product Grid is also applied when you open a product in the Product Edit Form.

If you cannot find your channel, the selected locale is not activated for that channel. To add a locale to a channel, refer to the Manage channels section in the PIM Catalog Settings Guide.
If you do not see your working channel, you may not have the appropriate access rights to view or edit products for this channel (Enterprise Package). Contact your administrator if needed.
The working scope or channel is different from the user interface catalog scope, which is part of its favorite catalog and product grid settings available from the user's account settings.
Navigating the Category Filter & Panel
To access the Category Filter, click on the Filters icon on the left side of the page. The Category Panel lets you navigate between category trees and categories, and filters the product grid to display only the products belonging to the selected category. The panel displays all the categories you have access to.


In the Enterprise Package, specific view, edit, and ownership rights (appropriate access rights) can be defined per category tree or category for each user group. If you cannot see certain categories or trees, this is expected: categories containing products you do not have view permission on are automatically hidden.
In the user's account settings, the default tree sets your default category tree in the catalog, i.e., which tree is selected by default in the left category panel when you open the product grid (and related catalog browsing screens).
The category filter and panel is only visible to users who have the List categories role permission. If you cannot see the category panel, contact your administrator.
Browsing Categories
At the top of the Category Panel, use the category tree dropdown to switch between different category trees (for example, switching from E-commerce to another tree).

Click on the arrow next to a category name to expand it and display its sub-categories, or to filter the grid to show only the products classified under that category.

You can also search by category code or label, and sort them as you prefer.
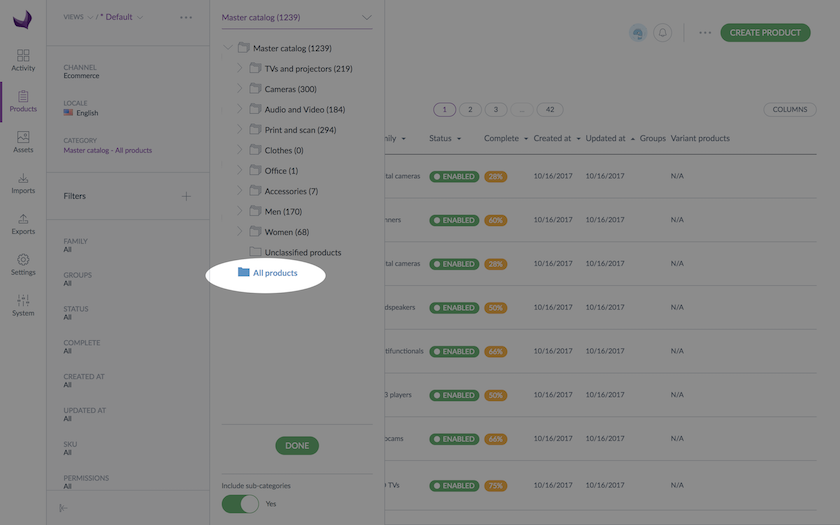
No category filter means including all categories. The “All” value in the Category filter includes products from the entire catalog, including unclassified products.
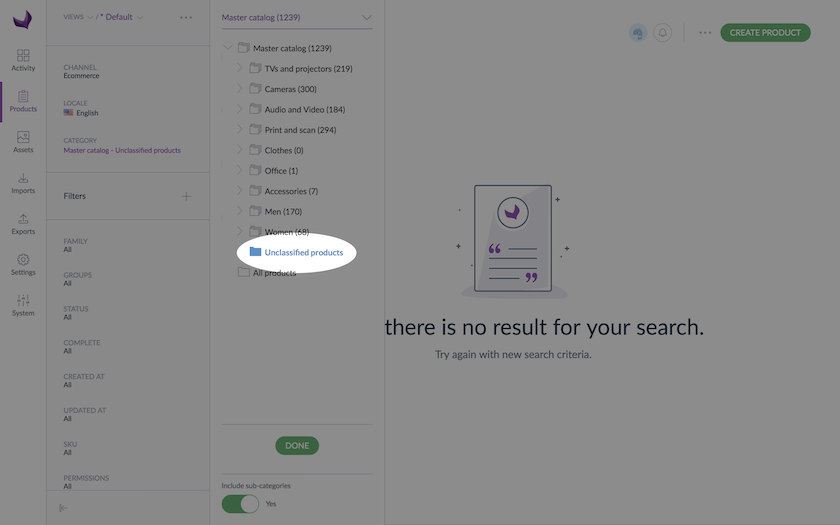
Viewing Unclassified Products
Below the category tree, you will find the entry Unclassified products. Click on it to display all products that have not been assigned to any category.
The Unclassified products option is only visible to users who have the View unclassified products in the product Grid user role permission.
The Unclassified products entry is added automatically by Akeneo PIM and cannot be removed or edited. Unclassified products are not exported. Make sure to categorize your products before exporting them.
Product Counter
Akeneo displays the number of products available in each category and category tree. A number in brackets next to each category name represents the total number of products classified in that category or any of its sub-categories.
In the Enterprise Package, the counter only reflects the products you are allowed to view and that are classified in that category. Products you do not have view or publish rights on are not counted. Refer to the article detailing the catalog's access rights for further details.
Including or Excluding Sub-categories
At the bottom of the category tree, an Include sub-categories Yes / No toggle controls whether products classified in sub-categories are counted and shown.
- Yes (default) — sub-categories are included
- No — only products directly classified in the selected category are shown
The category tree results update accordingly when you change this setting.
Further Product Searching and Filtering
PIM Global Search
For fast navigation across the PIM, use the Global Search by pressing Ctrl + K (or ⌘ + K on Mac), or by clicking the magnifying glass icon in the top-right corner of the interface.
Global Search lets you search across all entity types such as products, product models, attributes, categories, families, assets, associations, channels, locales, dependencies, etc. and navigate to almost any menu entry in the PIM from a single input. It is designed to speed up navigation and simplify onboarding for new users.

Search by Label or Identifier in the Product Grid
A dedicated search bar is available directly in the product grid to find specific products. This search applies only to the product identifier (or product model code) and the product label (the attribute configured as the label in the product's family).
The search uses a "contains" logic. For example, typing can will return all products or product models whose identifier, code, or label contains "can".
In addition, you can extend this behavior to certain text attributes. When a text attribute is configured as “Searchable in the main search bar”, its values are also indexed and can be used to find products from the product grid search bar, making it easier to search on secondary identifiers, shared SKUs, or other key text fields (depending on how your catalog is modeled).
You do not need to press Enter, results update automatically as you type.
If the label attribute is localizable or scopable, the search takes into account the locale and channel currently selected in the grid.
The Search bar is permanent, regardless of the product grid filters set in the user preferences.
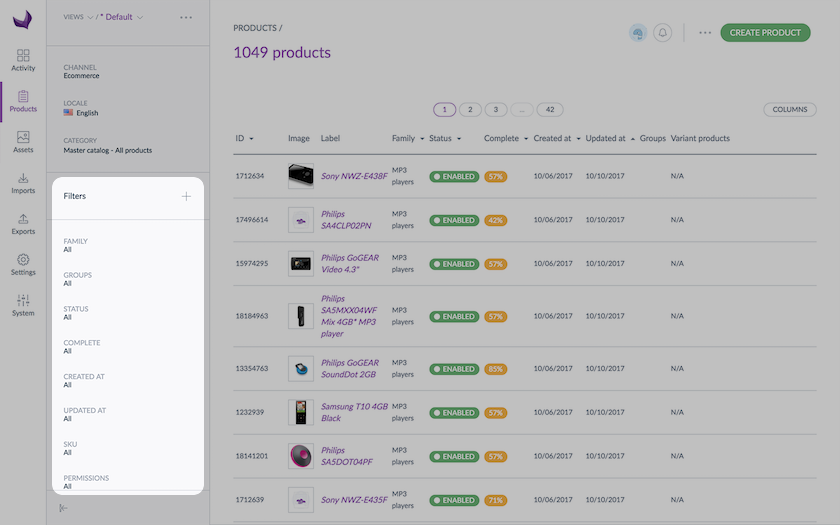
Using Filters
For an advanced filter management experience, click the Manage Filters icon in the left panel. The Filters Management Panel slides open, allowing you to search for, add, or remove filters in one place. Active filters appear in the left panel, below the channel and locale selectors.
To add filters:
- Click the Manage Filters icon in the left panel.
- Select the attributes you want to use as filters from the list. Use the search field at the top to find a specific property or attribute by name.
- Check the box next to an item to add it as an active filter.
- Uncheck an active filter to remove it from the left panel.
- Click Done to close the panel.
- Click on any active filter to set its operator and value. The new filters appear in the left panel and are immediately applied to the grid.
Filters can be applied to the following types of product information:
- System properties (managed by the PIM): Family, Groups, Status, Complete, Creation date, Updated date, Product identifier, Permissions, and more.
- Attribute values: any attribute with the property Usable as grid filter enabled
All 18 attribute types are supported as filters.

By default, if no property or attribute filter is applied, all results are included; similarly, if no criteria are applied to a multi-select attribute filter, all options are visible simultaneously in the grid.
If an attribute or attribute option is not translated in the active locale, its code is displayed in brackets (e.g., [attribute_name]).
Only attributes with the property Usable as grid filter enabled are available as filters. If an attribute is missing from the filter list, check that this property is activated for that attribute (Settings > Attributes > Properties > Type specific parameters) or refer to your PIM administrator (What is an attribute? article).
In the Enterprise Package, only the attributes part of the attribute groups your user group has permission to view or edit are available in the filters list. Refer to the article detailing the catalog's access rights for further details.
To configure your default Product grid filters, refer to your user's account settings and default preferences section (System > Users > Additional), or refer to your PIM administrator.
A maximum of 30 active filters can be applied simultaneously. When this limit is reached, an information banner appears at the top of the grid and no additional filters can be added until existing ones are removed.
To remove all active filters at once, click Clear all filters (Eraser icon) in the filter management button area.
Sharing Filters
Need to collaborate on a specific set of products? Instead of creating a permanently saved view, you can quickly copy and share a direct link to your currently filtered product grid.
This feature is ideal for ad-hoc teamwork such as pointing a colleague toward products missing specific attributes or flagging variants that need a localized review.
- Apply your filters on the Product Grid to display the desired product selection.
- Verify your context: Ensure the correct channel and locale are selected in the left panel, as these settings are captured in the link.
- Copy the link: Click the Share icon in the left panel, on top of the filter selection. The direct URL is instantly copied to your clipboard.
- Send: Paste the link in Slack, in an email, or in your preferred collaboration tool.
- When your colleague opens the link, their Product Grid will automatically load with your exact filter configuration, channel, and locale.

Akeneo PIM access rights still apply. If your colleague does not have permission to view a specific channel, locale, or category, the grid will automatically adapt to their permissions. As a result, they may see fewer products than you do.
For recurring grid setups that you or your team need to access regularly, we recommend creating a Saved View. Views remain accessible directly within the interface without needing to distribute a link each time.
Hiding or Expanding the Panel
You can collapse the left panel to give the product grid more horizontal space. Click the left arrow on the bottom-right corner of the panel to collapse it, the panel slides to the left edge of the screen. Click the arrow again to expand it.
Configuring the Grid Display
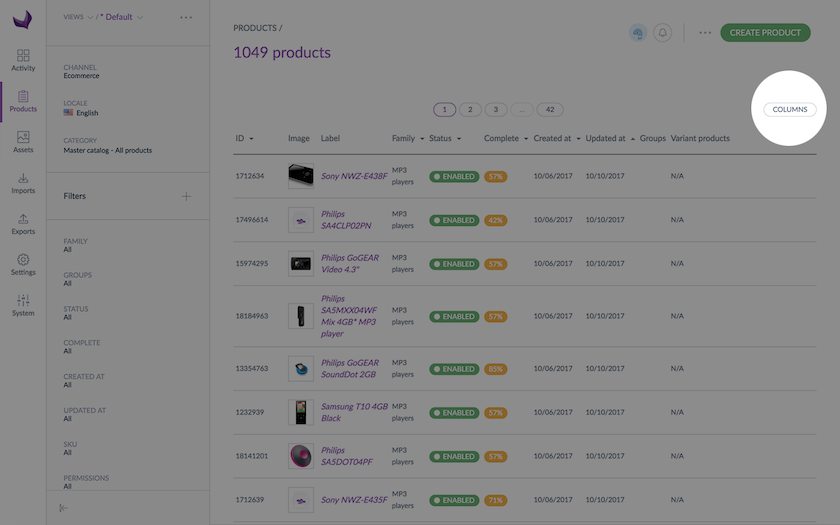
Managing Columns
You can choose which columns are displayed in the product grid. To add attributes and properties columns, use the Manage column icon. Column configurations are saved as part of your active View or Project and persist across sessions.
All attribute types are supported as columns, except the Product Link attribute types.

Only attributes with the property Usable as grid filter enabled are available as grid columns. If an attribute is missing from the column list, check that this property is activated for that attribute (Settings > Attributes > Properties > Type specific parameters) or refer to your PIM administrator (What is an attribute? article).
In the Enterprise Package, only the attributes part of the attribute groups your user group has permission to view or edit are available in the columns list. Refer to the article detailing the catalog's access rights for further details.
Product Link attributes are not supported as columns.
Reordering Columns by Drag and Drop
Beyond adding and removing columns, the Product Grid lets you rearrange, pin, and duplicate columns directly from the grid headers' ⋮, without opening the column configurator, from the Manage column icon.
You can reorder columns by dragging and dropping their headers into a new position. Click and hold any column header, then drag it left or right to the desired position. Release to drop it in place.
Sorting Results
Click the ⋮ icon on the column header, and choose how to sort results by that column. The active sort order is saved as part of the current View or Project configuration.

Pinning Columns
Pinning a column keeps it fixed to the left side of the grid as you scroll horizontally. This is useful when you want to keep a reference column or more, such as the product label or identifier, always visible while browsing many attribute columns.
To pin a column:
- Click the ⋮ icon on the column header to open the column settings.
- Check Pin this column.
To unpin it, open the same menu and uncheck Pin this column.
Pinned columns are grouped on the left side of the grid. A shadow is displayed on the right edge of the last pinned column to visually separate it from the scrollable area.
You can pin multiple columns. Their relative order can be adjusted by dragging and dropping within the pinned group.
Pinned and unpinned columns form two independent groups. A pinned column can only be reordered among other pinned columns, and an unpinned column can only be reordered among unpinned columns. Attempting to drag across the two groups has no effect.
Duplicating Columns for Context Comparison
You can duplicate any column to display the same attribute or property twice, side by side. This is particularly useful when you want to compare values for the same attribute across two different locales without switching context.
To duplicate a column:
- Click the ⋮ icon on the column header to open the column settings.
- Click the Duplicate icon. The duplicate appears immediately to the right of the original. It inherits the same locale and channel context as the source column.
- In the newly created column, use the ⋮ icon to change the locale on the duplicate independently to set up your comparison.


Adjusting the Number of Rows per Page
Use the Rows per page dropdown next to the search bar to control how many products are displayed per page. The available options are:
- 25 (default)
- 50
- 100
Your selection is saved in your browser and restored on your next session.

The Product Grid is designed to display a maximum of 50 columns at one time. Exceeding this limit impacts your workspace in two ways:
- Disabled Inline Editing: You will no longer be able to edit product values directly from the grid view.
- Reduced Performance: Loading times for the grid may slow down significantly.
The Product Grid can display a maximum of 10,000 results across all pages. If your catalog contains more matching items, refine your filters to narrow the result set.
Understand data persistence
The Advanced Product Grid distinguishes between configurations saved to your account and those temporary to your current browser tab. Understanding this distinction helps you optimize your daily workspace and product enrichment.
Identify what is saved to your account
These settings are stored on your account and follow you across different browsers, devices, and sessions.
What is saved:
- Saved Views: Any custom View you have explicitly created and saved, including its specific columns, filters, and sorting rules.
-
User Preferences: Defaults configured in your user profile (System → Users → [your user] → Additional):
- Catalog Locale — the Locale loaded in the grid when you open a fresh tab.
- Catalog Scope — the Channel loaded in the grid when you open a fresh tab.
- Default Tree — the Category Tree suggested in the category tree selector by default.
- Default Grid filters — the filters used by default.
- Default Product Grid View — the Saved View is loaded when you open the grid in a fresh tab.
These persist when you log in from a different computer, open the PIM in a new browser tab, or log out and return later.

Manage temporary changes
When you make on-the-fly adjustments without saving them to a View, those changes are kept in your browser's session storage and apply only to the active tab.
What is stored temporarily:
- Temporary filter adjustments.
- Unsaved column additions, removals, or reordering.
- Current pagination (the page number you are on).
- Active sorting applied to a column.
- Ad-hoc Channel and Locale changes made from the grid sidebar. (Your Catalog Scope and Catalog Locale in User Preferences are unaffected — only the current tab's View is changed. To change your defaults permanently, edit your User Preferences.)
Know when temporary changes are preserved
- Page refresh or Duplicated tab: Your temporary changes are preserved, including the ad-hoc Channel/Locale.
- Navigating inside the PIM: If you click into a product and use the back button, your grid state — including filter, sort, columns, and the page you were on — is restored.
Know when temporary changes are lost
- New tab: If you copy the URL into a new tab, your unsaved changes do not carry over. The grid reverts to your User Preferences (Catalog Scope, Catalog Locale, Default Tree, Default Grid filters, Default Product Grid View) and the View's saved configuration.
- Closing the tab or logging out: All unsaved session data is cleared.
To discard your unsaved adjustments without closing the tab, click Reset view below the View name. This clears your temporary filter, column, sort, and pagination changes and returns the grid to the Saved View's configuration.
Channel and Locale are not reset by this action — switch them back manually from the sidebar if needed, or open a new tab to fall back to your User Preferences.
Use cases: persistence in action
| Scenario | Behavior | Action needed |
|---|---|---|
|
The daily routine You want to see "Products to Enrich" every morning with specific localized Attributes. |
Saved Views. Create the View once and save it. It will be there every time you log in. | Click Save after configuring your View. |
|
The quick audit You need to filter for a specific SKU to check a value, but you do not need this filter tomorrow. |
Session only. Apply the filter. When you close the tab, the grid returns to its default state. | No action needed. Apply the filter and work. |
|
The collaborative review You are working in one tab but want to compare data in a second tab. |
The second tab loads your Saved View. Temporary filters from your first tab are not carried over. | Reapply temporary filters in the second tab if needed. |
The asterisk (*) next to a View name indicates unsaved changes or required system updates for Advanced mode. These changes are temporary and stored only in your browser tab. To keep them, click the ... (More) menu and select Save to update the current View, or Create a new view to preserve them separately. If you close the tab or log out without saving, your changes are lost.
If you find yourself constantly reapplying the same temporary filters, save them as a new View. This moves the configuration from your browser's temporary memory to the database, saving you time in future sessions.
Saved Advanced mode changes do not sync back to your Classic View. Each mode maintains its own configuration.
Taking Actions on Products from the Grid
Create a New Product or Product Model
To create a new product or product model directly from the Product Grid:
- Click the Create button in the top-right area of the page header.
- The Create modal opens. Select the type of record to create (Product or Product Model) and fill in the required information.
- For a product: Family, and SKU
- For a Product Model: Code, Family, and Family Variant.
- Save. You are redirected to the Product Edit Form to complete the enrichment.


The Create button is available if you have the Create a product user role permission.
Editing a Product or Product Model
To begin enriching your data, simply click on the row of the product or product model you wish to update. You will be instantly directed to the Product Edit Page, where you can modify attributes and manage product information.
Selecting Multiple Products
You can select products and product models individually or in bulk to apply mass actions. When at least one item is selected, the Selection Toolbar appears at the bottom of the page, showing the selected count and available actions. Use the checkboxes on each row to select products.
| Selection Method | How To | Result |
|---|---|---|
| Individual | Click the checkbox on a product row | Selects that specific product or product model |
| All results | Open the dropdown > Select all | Selects all products and product models matching your filters, except those manually deselected. |
| Clear selection | Open the dropdown > Unselect all | Clears the entire selection |

Launching Bulk Actions
Bulk actions let you apply changes to multiple products at once. They are accessible from the Selection Toolbar once one or more products are selected. The actions available to you depend on your user role permissions.
Mass Edit
Click Bulk Actions in the Selection Toolbar to open the modal.

The Mass Edit button is only visible to users who have the Product mass edit actions permission (System > Roles > Products). For support, refer to your PIM administrator.
To learn more, refer to the Bulk actions on products article.
Mass Edit
Inside the modal, each operation is individually controlled by its own permission. Only the operations your user role is authorized to perform will be shown:
| Operation | Description |
Permission Section in System > Roles |
Permission label |
|---|---|---|---|
| Edit attribute values |
Replace the attribute values of selected products with a new value, for example, set a new release date or update a text field. Previous values will be overwritten. Applies to products & product models. |
Products | Edit attributes of a product |
| Add attribute values |
Add values to multi-valued attributes (reference entity multiple links and multi-select attributes) without removing existing values. For example, add a collection or an asset. Note: the Table attribute is not compatible with this action. Applies to products & product models. |
Products | Edit attributes of a product |
| Remove attribute values |
Remove specific values from multi-valued attributes (reference entity multiple links and multi-select attributes) across selected products. Applies to products & product models. |
Products | Edit attributes of a product |
| Add to an existing product model |
Add a simple product as a variant to a product model (2-level variation) or to a sub product model (3-level variation). Applies to simple products. |
Products | Edit attributes of a product |
| Change the parent product model |
Change the parent product model of selected variant products or sub product models. Applies to variant products. |
Products | Edit attributes of a product |
| Change family |
Assign or change the family of selected simple products. Applies to simple products. |
Products | Change product family |
| Change status |
Enable or disable selected products. Applies to products & product models. |
Products | Change the status of a product |
| Add to groups |
Add selected products to one or more product groups. Applies to products & product models. |
Products | Add product to groups |
| Add to categories |
Add selected products or product models to one or more categories. Applies to products & product models. |
Products | Consult the categories of a product |
| Move between categories |
Change the categorization of selected products by moving them to different categories. Applies to products & product models. |
Products | Consult the categories of a product |
| Remove from categories |
Remove selected products from one or more categories. Products become uncategorized. Applies to products & product models. |
Products | Consult the categories of a product |
| Convert to simple products |
Remove the parent product model from selected variant products, converting them into simple products. Applies to variant products. |
Products | Convert a variant product to a simple product |
| Associate to products |
Add associations between selected products and other products or product models. Applies to products & product models. |
Products | Add associations to a product |
| Add to a workflow |
Mass-add selected products to an active workflow. (Enterprise Edition only, Advanced Package) Applies to products & product models. |
Workflows | Add product to workflow |
Sequential Edit
Click Sequential Edit to open each selected product one by one in the Product Edit Form. Navigate through your selection using the previous and next controls, reviewing and editing each product individually in sequence.

To learn more about Sequential Editing, refer to the Sequentially edit your products.
PX-Insight Analysis
Click PX-Inisght Analysis to run data-driven evaluations on selected products using your connected PX Insights (such as Ratings & Reviews or Shopping Performance).
This tool enables you to:
- Identify Trends: Convert customer signals into actionable insights to spot quality issues or market opportunities.
- Prioritize Tasks: Determine which product content requires immediate enrichment to improve discoverability and conversion rates.
- Automate Workflows: Trigger recommended actions to optimize product information based on real-world performance data.
To access the PX Insight Analysis action from the product grid, the following conditions must be met:
- PX Insights Activation: Your tenant must have PX Insights enabled. This feature is included in the Premium Package and available as an add-on for Advanced Packages.
- User Permissions: Your user profile must have permissions for List products and Product mass edit actions to trigger analysis from the grid action bar.
- Channel Access: You must have view or edit rights for the specific Channel selected in your grid context to perform actions on those products.
To learn more about PX-Insights, refer to the What is PX Insights? article.
Quick Export
Click Quick Export to download the selected products as a file.
When you initiate an export from the grid, you can configure two primary settings:
- All Attributes: Exports every attribute associated with the selected products, regardless of whether they are displayed on your current screen.
- Visible Attributes Only: Exports only the attribute columns currently configured in your grid view.
This option strictly exports product attributes. Standard system properties are excluded.
Your export automatically aligns with your active workspace settings:
- Channel Context: The export automatically respects the channel currently selected in your grid.
- Locale Selection: The export includes data for the active locale on your grid. Additionally, you can select extra locales to include in the export file on top of the active one.

To learn more about Quick Export in the Product Grid, refer to the Quick export your products article.
The Quick Export action requires the Launch an export profile and View export profiles list user's role permissions. If you do not have these rights, the Quick Export option will not be available. Refer to your PIM administrator for support (System > Roles > User > Permissions > Export profiles).
Mass Delete
Click the Delete action in the Selection Toolbar to permanently delete selected products and product models.
The Delete action is only visible to users who have the Remove a product permission. Refer to your PIM administrator for support (System > Roles > User > Permissions > Products).
Mass Delete is irreversible. Deleted products and product models cannot be recovered. Always carefully review your selection before confirming this action.
Displaying the Product Grid
Available Product entities
Akeneo PIM supports four product or hierarchy levels, each representing a distinct position in your catalog's variation hierarchy:
| Product | Hierarchy level Tag color (column) | Description |
|---|---|---|
| Model | Green | A root-level product model that groups variant products sharing common attributes. It sits at the top of a variation hierarchy and cannot be sold directly. Example: a T-shirt model available in multiple colors and sizes. |
| Submodel | Teal | An intermediate product model in a 3-level variation hierarchy. It sits between the root model and the variant products, grouping variants that share a subset of common attributes. Example: a T-shirt model in a specific color, with size variants underneath. |
| Variant | Blue | A product that belongs to a product model. It inherits common attributes from its parent model and carries its own specific variant attributes (the variant axes). Example: a T-shirt in color Red, size M. |
| Simple | Dark blue | A standalone product with no parent model and no variants. It is enriched and sold independently. Example: a one-size accessory or a product without any variation. |
The Product Grid offers three display modes that control how products and product models are presented in the list. The Display selector is located in the toolbar above the grid. The active mode is automatically saved as part of your View or Project, so your display preference is restored every time you reopen it.

Grouped (default)
Grouped is the default display mode. The catalog is organized around its variation hierarchy, and is displayed either as Simple products or Product Models as top-level entries.
This mode is best suited for enriching common attributes shared across a product entity, or for getting a structured overview of your catalog.
In Grouped mode, the Product Level filter is available to restrict the grid to:
| Product Level option | What is shown |
|---|---|
| Simple | Standalone simple products (no parent model) |
| Variant | Variant products, displayed as the Product Model they are belonging to |
In Grouped mode, the Hierarchy Level filter is available to drill down the grid to one or more specific levels of the variation hierarchy, hence automatically ungrouping its display:
| Hierarchy Level option | What is shown |
|---|---|
| Product Model | Root-level product models only |
| Submodel | Intermediate product models only |
| Simple | Standalone simple products (no parent model) |
| Variant | Variant products belonging to a product model |
Ungrouped
Ungrouped mode displays only sellable products, Simple Products and Variants. Product models and submodels are excluded entirely: they will return no results in this mode, even if they match the active search or filter criteria.
This mode is ideal when you want to focus on the products that can be ordered or exported, independently of their variation structure.
In Ungrouped mode, both the Product Level filter and the the Hierarchy Level filter are available to similarly restrict the list and display:
| Product Level or Hierarchy Level option | What is shown |
|---|---|
| Simple | Standalone simple products only (no parent model) |
| Variant | Variant products only (children of a product model) |

Flat
Flat mode displays every record in the catalog as individual rows in a single undifferentiated list, product models, submodels, variant products, and simple products, with no grouping or hierarchy applied.This mode is ideal for task management.
In Flat mode, the Product Level filter is available to restrict the grid to:
| Product Level option | What is shown |
|---|---|
| Simple | Standalone simple products (no parent model) |
| Variant | Variant products, Root-level product models and Intermediate product models only |
Alternatively, you can narrow down what is shown on demand by adding the Hierarchy level filter from the filter panel, and/or display its tag in columns to identify each row's type at a glance. This filter flatly exposes all product type options:
| Hierarchy Level option | What is shown |
|---|---|
| Product Model | Root-level product models only |
| Submodel | Intermediate product models only |
| Simple | Standalone simple products only |
| Variant | Variant products only |

The active display mode is saved as part of your View or Project. When you reopen a saved View or Project, the grid restores exactly the display mode, level filters, and column configuration that were active when it was last saved.
Visualizing Your Product Hierarchy
Managing complex products in Akeneo PIM requires a clear understanding of how data flows from models down to specific variants. When a product belongs to a multi-level structure, a flat grid view isn't enough to see the full picture.
The Product Hierarchy View provides an interactive map of your product relationships directly within the Product Grid. This granular context allows you to navigate parent-child relationships and troubleshoot your catalog at a glance.
To see the full context, hover over the Product Model, Sub Model or Variant and click the Hierarchy icon that appears to open the overview.
This view provides a structured map of your product data, including:
- Global Structure: View the entire tree, from the root-level Product Model through Sub-Models to the final Variants.
- Variant Counters: Instantly see the total number of variants linked to each level of the hierarchy.
- Variant Axes: Identify the specific attributes (such as color or size) that define each level.
- Internal Search: Quickly locate a specific entity within the hierarchy using the dedicated search bar.
- Dynamic Navigation: Use Collapse/Expand buttons to simplify your view or dive deep into specific branches.


Inline Editing in the Grid
The Product Grid supports inline editing, allowing you to update Boolean attribute values directly within the grid table, without opening each product individually in the Product Edit Form. This is useful for quickly toggling Boolean flags (such as "Is new", "Is on sale", or any custom Boolean attribute) across your product list.
How to Edit Inline
- Ensure the Boolean attribute column you want to edit is visible in the grid. If not, add it via the Manage Columns icon.
- Activate Edit Mode in the page header.
- Editable Boolean cells become interactive; click to toggle the value directly in the table.
- Click Save to apply all changes, or Cancel to discard them.


Only Boolean attribute types can be edited inline in the grid at this time. To edit other attribute types, open the product in the Product Edit Form.
While Edit Mode is active, the Create button is hidden. Exit Edit Mode to resume standard navigation and product creation.
When performing a mass update on boolean attributes, the processing time is directly tied to the number of products selected. While individual updates are instantaneous, saving changes across a large dataset may require a brief moment for the PIM to synchronize the data across all affected records.
If your changes fail to save, verify that your updates don’t violate attribute dependencies and that you have the required permissions for the product’s categories. In the event of duplicate Boolean attributes within the same context (channel and/or locale), the system also replicates the value upon saving.
Working with Views
Views let you save and reload a complete grid configuration, with filters, columns, sort order, channel, and locale, under a named preset. Use Views to switch instantly between recurring grid setups without reconfiguring each time. The Views Selector appears at the top of the left panel.

Saving a View
- Configure the grid to your desired state: filters, columns, sort order, categories, channel, and locale.
- In the View Selector, click Save or Create a view if you want to save the desired state in another view; otherwise, a (*) close to the View indicates that there are unsaved changes.
- Name the view and confirm.

Loading a View
- Open the secondary View Selector dropdown in the left panel.
- Select the view you want to apply. The grid updates immediately.
When your current grid configuration differs from the saved view, an indicator (*) shows that unsaved changes exist. You can update the view to save your new configuration, or discard the changes by reloading the view.
Your last-used View configuration is remembered and automatically restored the next time you open the Product Grid.
In the user's account settings, the Default product grid view sets which saved View Akeneo loads automatically when you open the product grid.
To learn more, refer to Manage your views article.
Working with Projects
Projects are team-scoped enrichment campaigns that focus contributors on a defined set of products, with a specific channel, locale, and deadline.
To work within a project:
- In the Views Selector, switch to Projects.
- Select your project from the Project Selector in the left panel.
- The grid automatically applies the project's filters, columns, channel, and locale.
The option to delete a project is only visible to users who have the Delete views and projects permission.
Projects is an Enterprise Package feature.
To learn more, refer to What is a project?, Discover the project widget in the dashboard and Understand your project notifications articles.
UI Permissions Summary
The following table lists all permissions that control visibility and access to features in the Product Grid.
| Section in System > Roles | Permission label | Feature | Effect when missing |
|---|---|---|---|
| Categories | List categories | Category Panel | Category panel is hidden |
| View unclassified products in the Product Grid | Unclassified products filter | Unclassified products option is hidden in the category panel | |
| Products | Product mass edit actions | Mass Edit button | Mass Edit button is hidden in the Selection Toolbar |
| Edit attributes of a product | Edit / Add / Remove attribute values (bulk) | These operations are hidden inside the Mass Edit modal | |
| Edit attributes of a product | Add to existing product model (bulk) | Operation hidden inside the Mass Edit modal | |
| Edit attributes of a product | Change the parent product model (bulk) | Operation hidden inside the Mass Edit modal | |
| Change product family | Change family (bulk) | Operation hidden inside the Mass Edit modal | |
| Change the status of a product | Change status (bulk) | Operation hidden inside the Mass Edit modal | |
| Add product to groups | Add to groups (bulk) | Operation hidden inside the Mass Edit modal | |
| Consult the categories of a product | Add / Move / Remove categories (bulk) | These three operations are hidden inside the Mass Edit modal | |
| Convert a variant product to a simple product | Convert to simple products (bulk) | Operation hidden inside the Mass Edit modal | |
| Add associations to a product | Associate to products (bulk) | Operation hidden inside the Mass Edit modal | |
| Remove a product | Mass Delete | Delete action is hidden in the Selection Toolbar | |
| Workflows | Add product to workflow | Add products to a workflow (bulk) (EE only) | |
| Export profiles | View export profiles list | Quick Export | Quick Export action is not available |
| Launch an export profile | Quick Export | ||
| Views and projects | Delete public views and projects | Delete a View or Project | Delete option is hidden in the View / Project actions menu |
To grant or revoke a permission, go to System > Roles, open the relevant user role, and locate the permission under the section indicated in the Section in System > Roles column. Refer to your PIM admin for support. To learn more, refer to the What is a user role? article.
Where is the product grid? Classic
To access your products: click on the Products menu. You will land on the product grid.
This page contains all information you need to start working on your catalog: your products, your categories, some filters, your scopes, and locales.
The following sections will show how to set up your work environment.
Locale & channel context
Select a locale context
You will find all your products on the product grid page by default. You can choose your working locale if several locales have been activated. The locale selection will impact the following information on the page:
- The category labels (on the left panel)
- The attribute labels that can be used as filters (on the filters section in the left panel)
- The labels of attribute groups
- The attribute option labels used as values (on the product grid)
- The completeness displayed (its percentage in the Complete grid column)
- The product or attribute values in the product grid
The locale selected in the dropdown menu is your working locale. Every time it changes, the product information will be updated in the product grid.
- The locales displayed have been added to at least one channel. If you do not see your working locale, it is more likely that you do not have the appropriate access rights to view or edit products for this working locale (Enterprise version). In this case, then don't hesitate to get in touch with your administrator. Another possibility is that the locale is not required by any channel; therefore, it is not activated. To add a locale to a channel, please refer to “Manage channels” in the PIM Catalog Settings Guide
- The working locale selected on the product grid’s page is also applied when you edit or view a product form.
- The working locale is different from the user interface locale of the user.
Select a channel context
On the left side of the grid, you have a drop-down menu to select your channel.
The selected channel or scope will be your working channel (or working scope). Selecting a channel impacts values displayed on the product grid, especially if your attribute information differs depending on the channel.
This will also impact the completeness displayed since there can be one completeness percentage per channel/locale combination. Therefore the product grid is updated whenever the working channel changes.
The available channels are those concerned with the locale selected higher up on the page. If you don’t find your channel, the locale selected is not required for the channel you want, so it is not proposed. To add a locale to a channel, refer to the “Manage channels” section in the PIM Catalog Settings Guide.
Like the locale, the channel selected on the product grid’s page is applied when editing a product form.
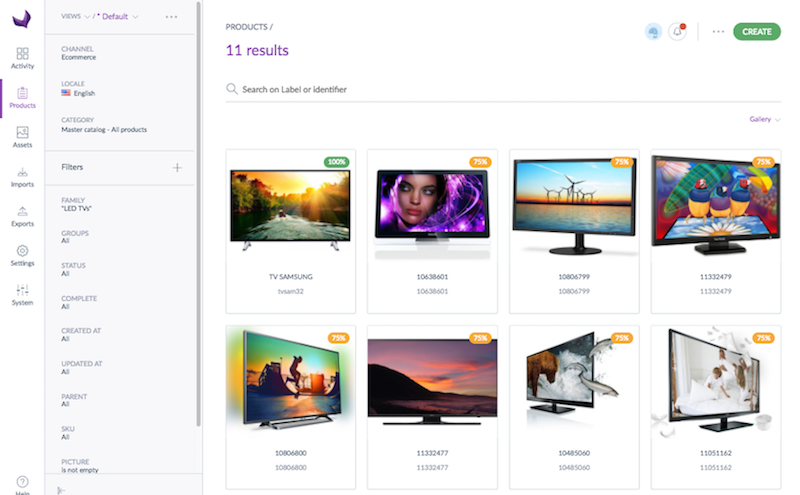
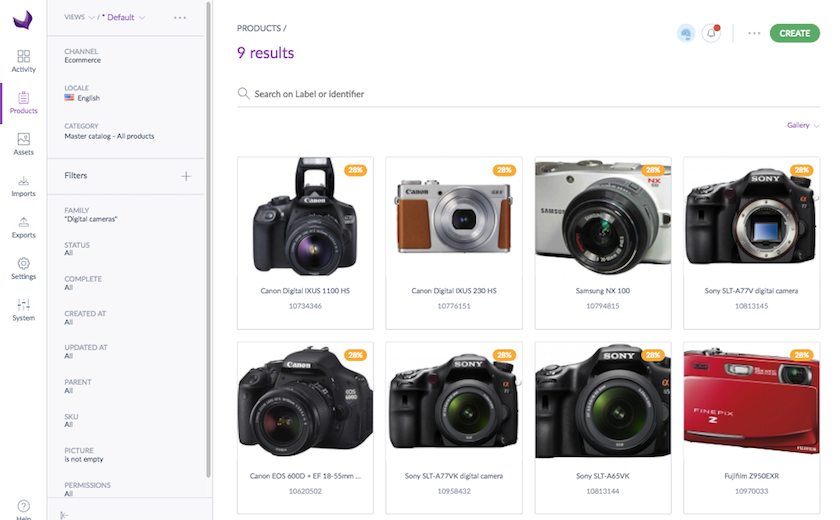
Product grid display
A Gallery display of the product grid is available to highlight the products' images. This display can be used to find products by their images and update them quickly.
With the Gallery display, the following properties are displayed in the grid (you cannot choose them, there is no Columns button available):
- Identifier for a product (attribute defined as product identifier) or code for a product model
- Label: attribute used as "label" in the product family
- Image: attribute used as "main picture" in the product family.
- Completeness of a product
- Number of complete variant products out of the number of variant products for a product model (ex: "2/3" means that 2 variants out of 3 for the product model are complete)
For product models, if the attribute as the main image is set at the variant level, the main image of the product model will be the first image found in its variants, ordered by the creation date.
Other grid features also apply to this display (channel, locale, and categories selection, filters, pagination, product selection, etc.).
To use the Gallery display:
- Click on List to change the display
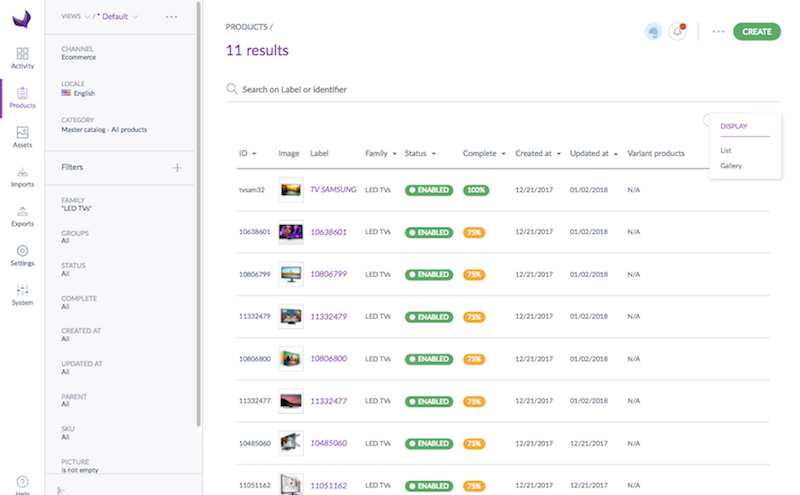
- Select the display Gallery
The context of the chosen display for the product grid is kept.
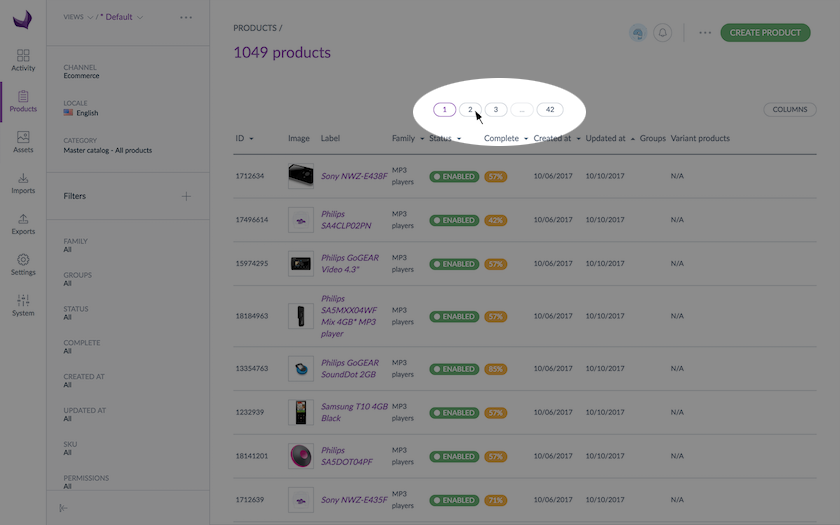
Product grid pagination
The product grid displays 25 products per page. To browse product pages, click on the number of the page you want to reach.
The grid can display up to 400 pages (10000 results). However, you can use the filters in the grid to optimize the results displayed.
Category panel
Browse products’ categories
You will see the category panel on the left side of the page. This panel allows you to easily navigate between category trees or categories. It displays all categories you have access to.
In the Enterprise Edition, you can define specific rights on categories and category trees to define which user group can see, edit, or own products of these categories or category trees. You may not see some specific trees or categories. It's normal behavior: we hide the categories or category trees of products you don't have view permission on. Click on a category name to expand or display its products in the grid.
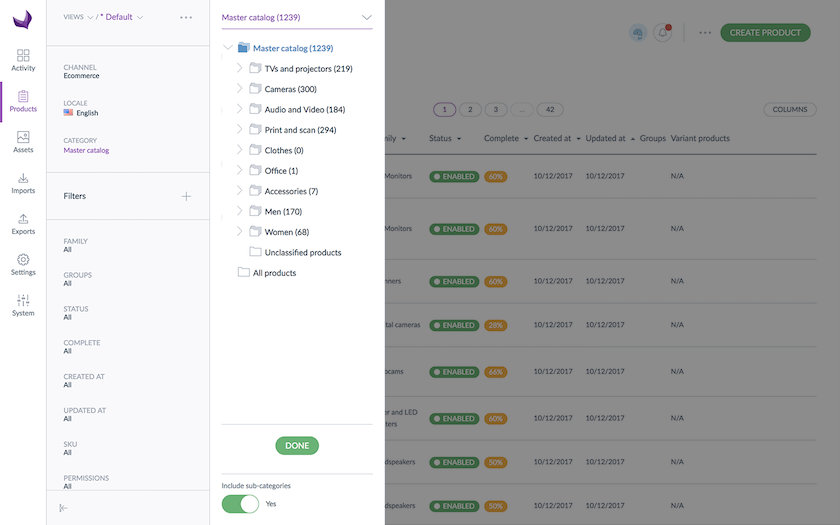
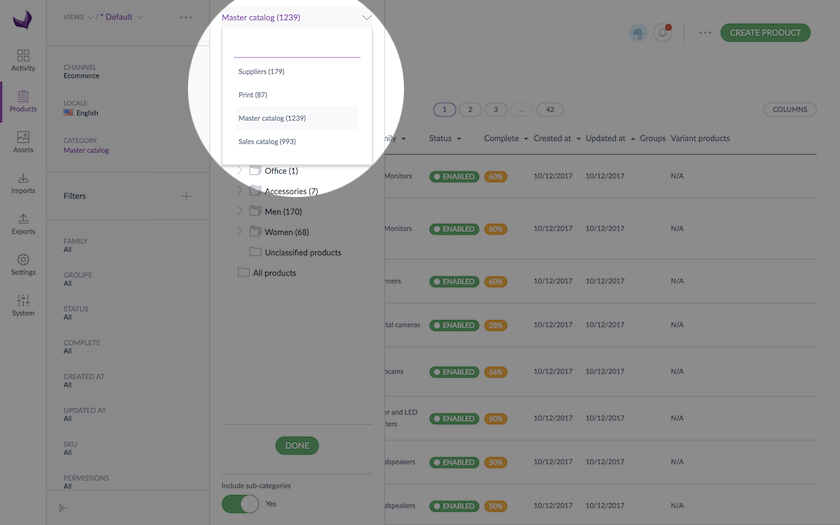
Click on the higher dropdown menu to select another category tree, Master Catalog, in our screenshot above.
View unclassified products
Below the category tree, you will see an additional category: Unclassified products. Click on this category to see all unclassified products. this category is added automatically by the PIM and cannot be removed or edited.
Remember that unclassified products are not exported.
View all products
Click on All products to see all products (categorized and uncategorized) of the selected category tree.
Product counter
Akeneo displays the number of products available in each category and category tree. You will see a number in brackets nearby each category; this figure represents the total number of products classified in this category or sub-category. In the Enterprise Edition, this figure represents the total number of products you are allowed to view and that are classified in this category or sub-category.
At the bottom of the category tree, you will see a Yes/No option: Include sub-categories.

This option takes into account the number of products classified in sub-categories. By default, this option is set to Yes; hence subcategories are included. Select No if you do not want to consider products classified in subcategories. The tree will then be updated accordingly.
In the Enterprise Edition, only the products you have rights to view and publish are counted. The other products are not taken into account.
Hide or expand the category panel
You can hide the category panel to allow you to display the product grid widely. To do so, click on the left arrow on the bottom right corner of the panel:

The category panel will be reduced automatically to the left side.
To expand the panel, click again on the arrow; the panel will be displayed.
Customize the grid
Use filters
The product grid includes filter management. By default, the PIM displays System attributes (Family, Groups...):
You can use the filters displayed or add new filters: click on the + icon and select the new attributes you want to use as filters. The new filters will appear in the left panel. You can now filter your products displayed in the grid.
If an attribute or an attribute option is not translated in the active locale, its code will be displayed into brackets like [name], and only the attributes having the property «usable as grid filter» enabled are available to be used as filters.
The filters can be applied to the following product information:
- Product information managed by the PIM: Family, Groups, Status, Complete, Creation date, Updated date, product identifier, Permissions
- Product information is managed via the attributes
To define your default product grid filters in your user account, refer to the “Change your default preferences” section.
If no default filters are set in your user account, the PIM will use the system attributes as default product grid filters: family, groups, status, complete, complete product, creation date, updated date, product identifier, and permissions.
If you are missing an attribute in the Filters menu, check if it is well-activated as «usable as grid filter».
Only the attributes you can view or edit are available in the list of filters on the product grid.
Global search
With a simple Ctrl/Command + K (or apple+ K), and our new magnifying glass icon on the top right corner, users can perform a smart search on products, product models, families, categories and navigate to almost all menu entries of the PIM!
This tool is designed to enable faster navigation within the PIM, and we believe it will also simplify onboarding for new users by empowering them with greater autonomy.
Search by label and identifier
Additionally, a search bar is available in the product grid to quickly find products. The search is only on the identifier (product identifier or product model code) and the label (attribute used as "label" in the product family).
The behavior of the search is a "contains" filter. For example, if you type in "can", it will display all the products or product models with an identifier/code or a label that contains "can".
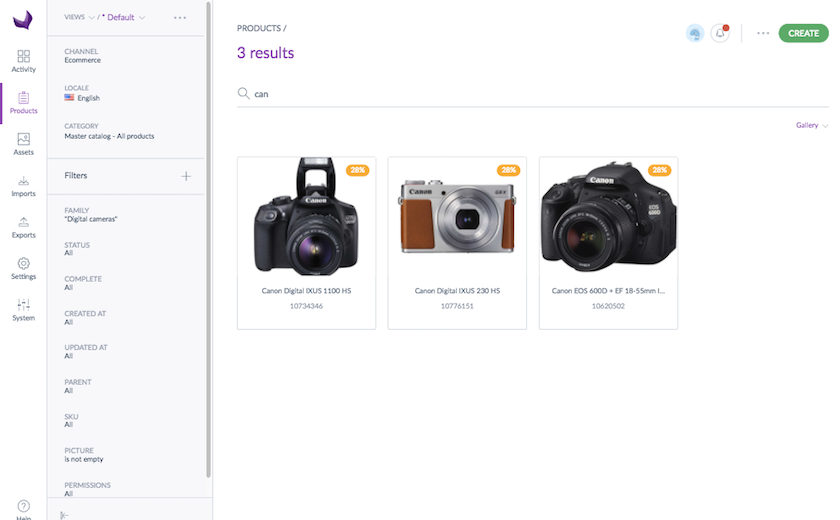
You don't need to press enter to search; enter a few characters, and it will automatically search.
If the label is localizable or scopable, the search considers the locale and the channel selected in the grid.
Configure grid columns
Now you’re set up with your filters; you can select which columns you want to see in the grid. By default, Akeneo displays the System attributes as columns.
By default, the grid displays the following columns:
- ID (displays the product identifier or product model code)
- Label (the product’s display name in Akeneo)
- Family
- Status (Enabled/Disabled)
- Complete (the completeness percentage)
- Created at (the creation date of the product)
- Updated at (the product's last updated date)
- Groups (if the product belongs to groups)
- Complete product
Configure columns
Click on Columns on the right side of the grid to display the column selection window:
You will see your attribute groups on the left side of the window.
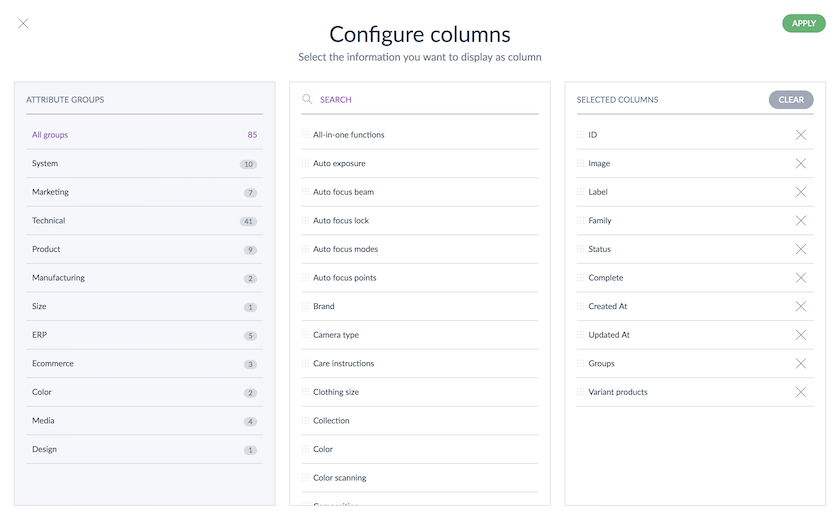
Nearby each group, you will see the number of attributes belonging to this group that can be used as columns in the grid. Click on a group to display its attributes in the middle column.
If you want to display all attributes, select «All groups». On the right side, you will see your current grid’s columns.
Only attributes with the property «usable as grid filter» activated can be used as columns.
And as for categories and locales, if you are an Enterprise Edition client and you cannot see an attribute, it is likely that you do not have permission to view it.
Add attributes as columns
Select an attribute group on the left side or select All groups. Drag your attribute in the mid-column and drop it in the right column. Use the search tool to look for a specific attribute. Move your attribute up and down to reorder them.
Remove attributes as columns
Click on Clear top of the screen to remove the current grid’s attributes, or use the “bin” icon to remove a specific attribute from the grid. You need to have at least one attribute as a column.
Click on Apply to save your changes. Your customized grid will be displayed.
Sort values within the grid
You can also sort on some column headers; for instance, you can sort products on SKU, family, status, complete, created, and updated at, as well as on some attributes (text, text area, number, simple select attributes, date, yes/no).
You can not sort values on price, media, asset, metric, multi-select attributes and Label and Groups system attributes. To check if you can sort on a column, simply hover your mouse over the column’s header.
Action shortcuts on single products
There is a set of actions available for each product. They are available on the right side of the product grid when you mouse over the product’s line:
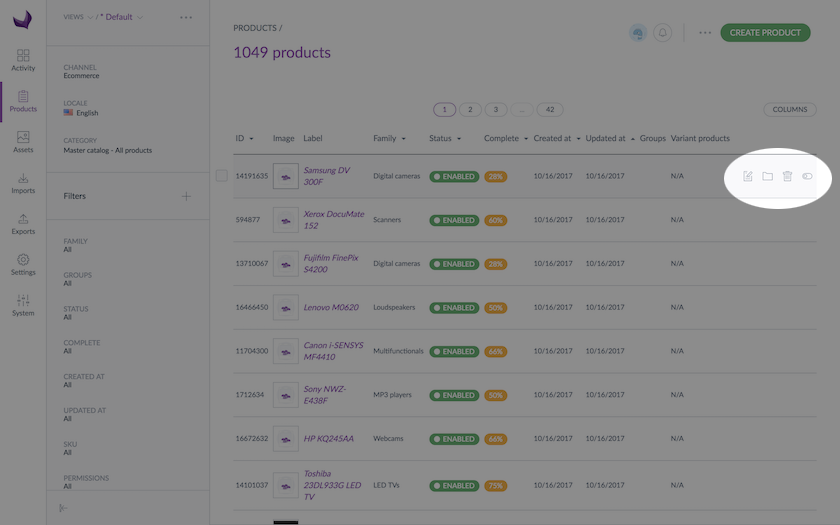
Depending on your Akeneo version (Enterprise or Community) and your rights, you might not see all these shortcut actions: edit the product information, edit its categories, delete it, or change its status.
You will then be able to edit the product information by clicking on the small pencil icon, edit its categories by clicking on the small folder icon, delete it with the bin icon, and change its status thanks to the 2 arrows icon.
The shortcut actions are displayed if you have the appropriate rights, or if you are working with the Enterprise Edition or the Community Version of the Akeneo PIM.